MOVIE
Vol.56

Designer
L.S.
Getting Started with Color Grading in Adobe Premiere Pro
INDEX
What Is Color Correction in the First Place?
Lumetri Color
Lumetri Color: “Basic Correction”
Basic Correction: “LUT Settings”
Lumetri Color: “Creative”
Lumetri Color: “Curves”
Finally


What Is Color Correction in the First Place?
As a test, I tried correcting footage of cherry blossoms using Lumetri Color.
The cherry blossom colors already looked beautiful as they were, but I wanted to emphasize the pink tones of the petals, so I adjusted the overall image to enhance the magenta tones.
Color correction is not only about adjusting the colors in the footage itself, but also about thinking carefully about “how you want the video to look.” Keeping this in mind can make the correction process much easier and less confusing.

Lumetri Color
Applications used for video color correction include professional color grading tools such as SpeedGrade and After Effects.
These applications can work together through Dynamic Link and Direct Link for advanced color correction workflows.
Adobe SpeedGrade CC
However, for someone like me who is already familiar with Premiere, these tools can feel difficult to use, and considering overall workflow efficiency, I prefer to complete the editing process directly within Premiere Pro whenever possible.
That’s where the extremely useful Lumetri Color feature comes in, introduced as a new feature in Premiere Pro CC 2015.
It is especially helpful when you want to make detailed adjustments much like you would in Photoshop.
Open the panel by selecting:
Window > Lumetri Color

Lumetri Color includes the following sections, allowing you to perform color correction in a workflow that feels very similar to Photoshop.
Basic Correction
Adjust LUT settings, white balance, and tone.
Creative
Apply LOOK presets and adjust sharpness, fade, and vibrance.
Curves
Adjust RGB curves and Hue/Saturation curves.
Color Wheels
Adjust shadows, midtones, and highlights.
HSL Secondary
A color tool for isolating color/luminance keys and applying secondary color correction.
Vignette
Control the size, shape, and brightness of edge shading.
Next, we’ll introduce some of the features that are most commonly used.
Lumetri Color: “Basic Correction”
In this section, you can adjust the brightness using “Exposure” and determine the overall tone of the footage using “Contrast,” “Highlights,” and “Shadows.”
Exposure
Adjusts the overall brightness of the footage. Moving the slider to the right increases the highlights, while moving it to the left strengthens the shadows.
Contrast
Contrast adjustments mainly affect the midtones of the video. Increasing the contrast makes midtone and darker areas appear darker, while decreasing the contrast makes midtone and brighter areas appear brighter.
Highlights
Adjusts the bright areas of the image. Dragging the slider to the left darkens the highlights. Dragging it to the right brightens the highlights while minimizing clipping.
Shadows
Adjusts the dark areas of the image. Dragging the slider to the left darkens the shadows while minimizing clipping. Dragging it to the right brightens the shadows and restores detail in darker areas.
Whites / Blacks
These controls may be less familiar to some users. Adjusting the sliders changes the intensity of highlights and makes shadows appear closer to true black.
Saturation
Adjusts the overall color saturation of the video.

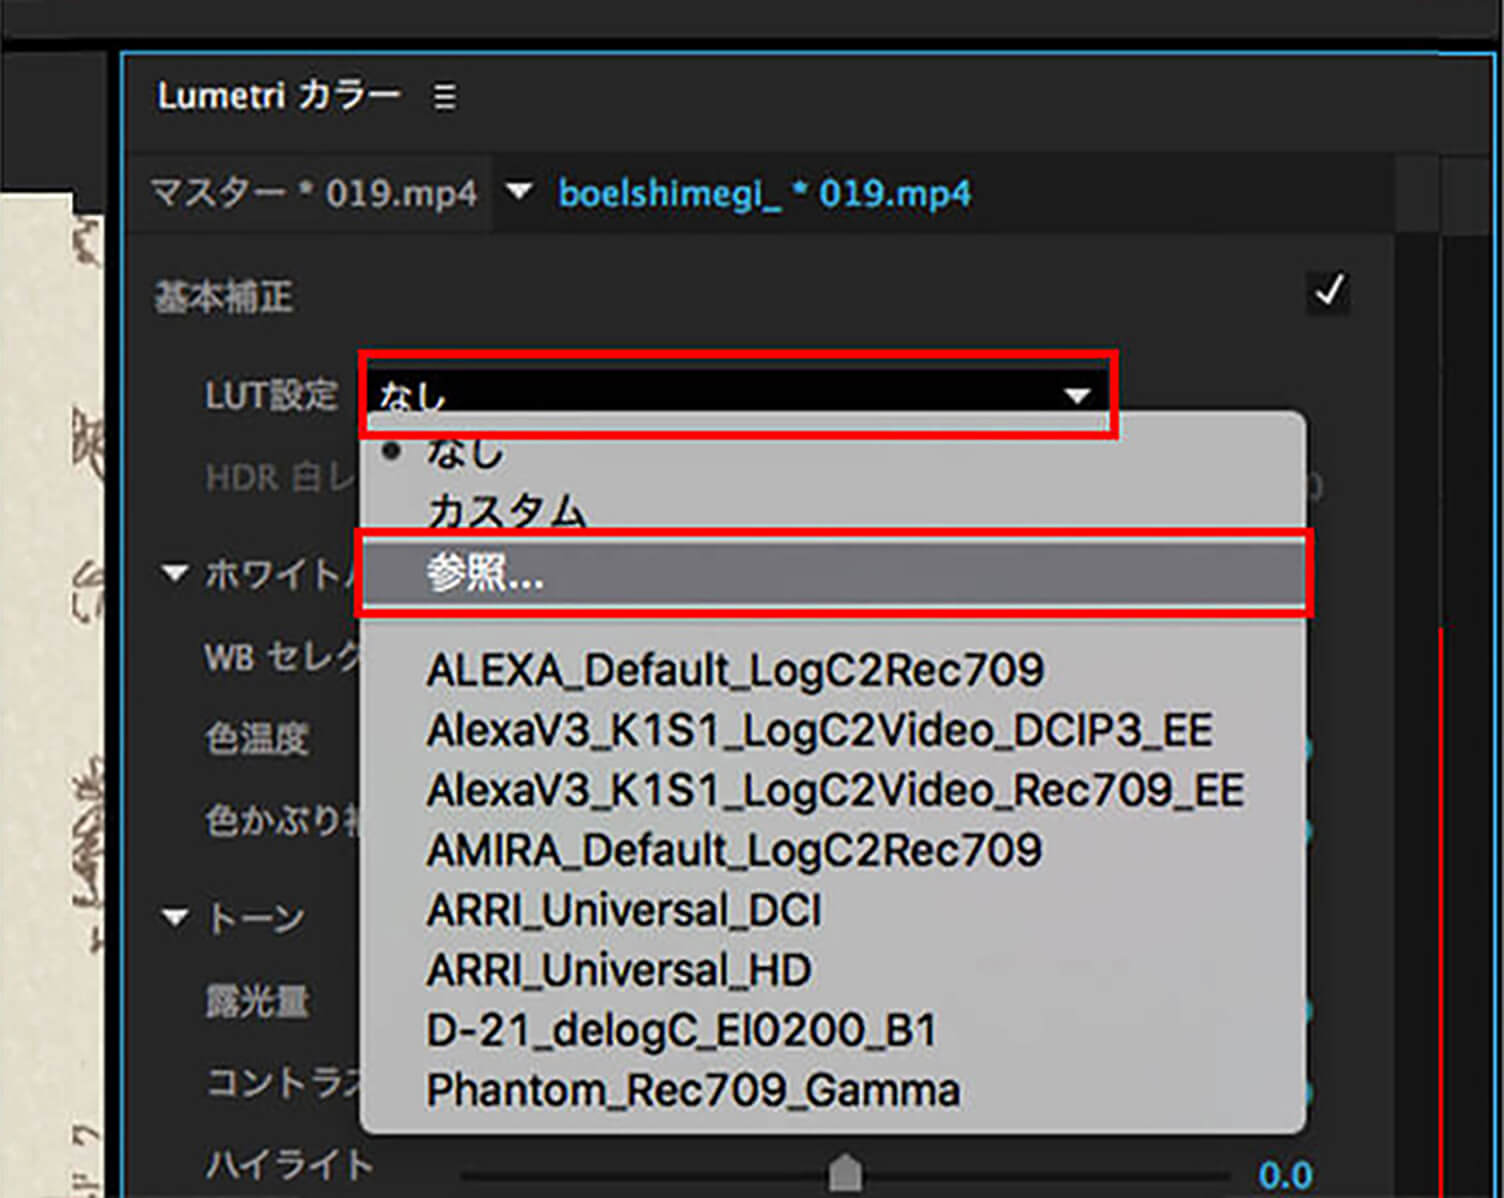
Basic Correction: “LUT Settings”
What Is a LUT?
A LUT (Look-Up Table) is a profile used to convert color spaces.
When working with Log data (uncompressed data), it can restore footage to a look that is closer to the camera image sensor’s original specifications.
You can configure this setting from:
Basic Correction > LUT Settings
If you have created a custom LUT, you can load the LUT file by selecting “Browse” from the LUT Settings dropdown menu.
If there is no specific LUT to apply, set it to “None.”
Lumetri Color: “Creative”
By selecting and applying a preset from “LOOK,” you can give your footage the appearance of professionally shot film.
You can also adjust the intensity using the “Intensity” setting, allowing you to fine-tune the color style to match each video. Rather than simply adjusting colors, this section is more about defining the overall mood and impression of the footage.
Vibrance
Adjusts saturation while minimizing clipping as the overall color saturation approaches its maximum value. This setting increases the saturation of lower-saturation colors while reducing the impact on colors that are already highly saturated.
Using Vibrance is also useful for preventing skin tones from becoming overly saturated.
Saturation
Adjusts the saturation of all colors in the video, ranging from monochrome to double saturation.

Lumetri Color: “Curves”
You can adjust the overall color tone of the footage here.
This feature is similar to the “Tone Curve” function in Photoshop. RGB Curves and Hue/Saturation Curves are used to adjust brightness and contrast.
RGB Curves
1. Select to adjust the red, green, or blue color channels
2. Master curve for controlling luminance
3. Click to add control points
With RGB Curves, you can adjust the luminance and tonal range of the entire clip using curves.
The master curve adjusts overall brightness.
Adjusting the master curve affects all three RGB channels simultaneously.
You can also choose to adjust only one specific channel: red, green, or blue.
Hue/Saturation Curves
1. Click to manually add control points
2. Drag the white circle inward or outward to adjust saturation
Hue/Saturation Curves allow you to increase or decrease the saturation of specific hues.

Finally
What did you think?
Even with just the “Lumetri Color” features introduced here, you can achieve detailed color correction that closely matches your creative vision.
By applying color correction, you can bring your footage closer to your ideal look, so don’t hesitate to experiment and try different adjustments.
RECENT POSTS

Vol.204
Brand experience: Reconnecting a company's current reality with society

Vol.203
What Is Design Management

Vol.202
Why Hiring No Longer Works— Redesigning Organizations and Decisions for an Uncertain Age

Vol.201
How to Choose a Branding Agency: 5 Criteria to Avoid Failure

Vol.200
Design Management: A Practical Guide for SMEs and Startups to Drive Real Results

Vol.199
How to Rebuild Brand Competitiveness: A Practical Guide to Brand Management for SMEs


