TECH
Vol.38

Art Director
L.S.
Useful Web Analytics Tool to Know: Google Analytics
In this article, we’ll introduce :contentReference[oaicite:0]{index=0}, a tool you should definitely start using once you create a website.
*Please note: this article is based on information available as of January 22, 2016.
INDEX
Google Analytics
Create a Google Analytics Account
Tracking Code and Installing Google Analytics
Viewing Website Data with Google Analytics
Conclusion


Google Analytics
:contentReference[oaicite:0]{index=0} is a website traffic analysis tool provided by :contentReference[oaicite:1]{index=1}.
It allows you to analyze a wide range of data related to website traffic, such as “which pages users are viewing,” “where visitors are coming from,” and “which pages have high bounce rates.”
By examining this data, you can better understand what kind of approach or improvements should be made for your website.
Create a Google Analytics Account
1. Preparation Before Getting Started
To start using :contentReference[oaicite:0]{index=0}, you will need a :contentReference[oaicite:1]{index=1} account.
Make sure to create and register your Google account in advance.

2. Register for a Google Analytics Account
After creating your :contentReference[oaicite:0]{index=0} account, access the official :contentReference[oaicite:1]{index=1} website.
:contentReference[oaicite:2]{index=2}
Click “Create an account” in the upper-right corner.
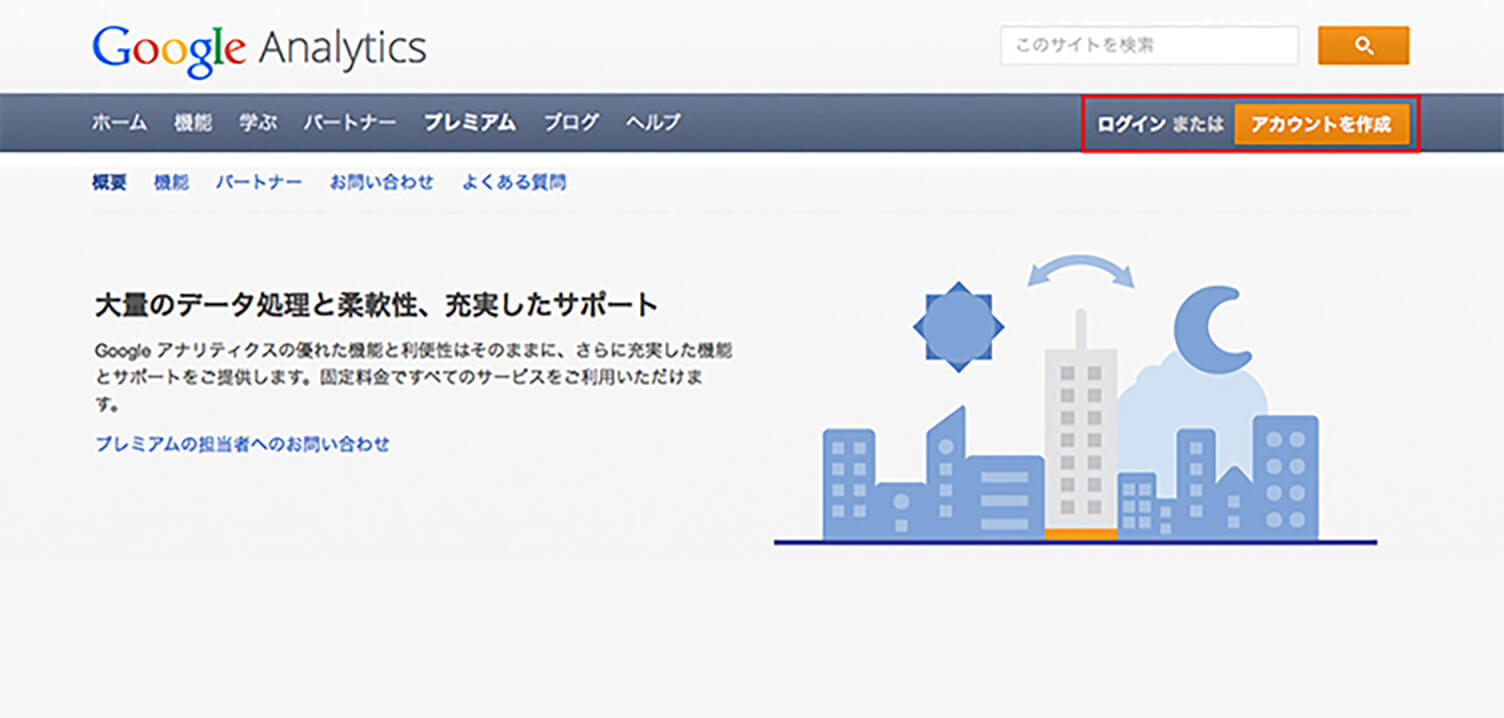
The Google account login screen will appear.
Enter the email address and password for the Google account you want to use with Google Analytics, then click “Sign In.”
You will then see a screen like the following.
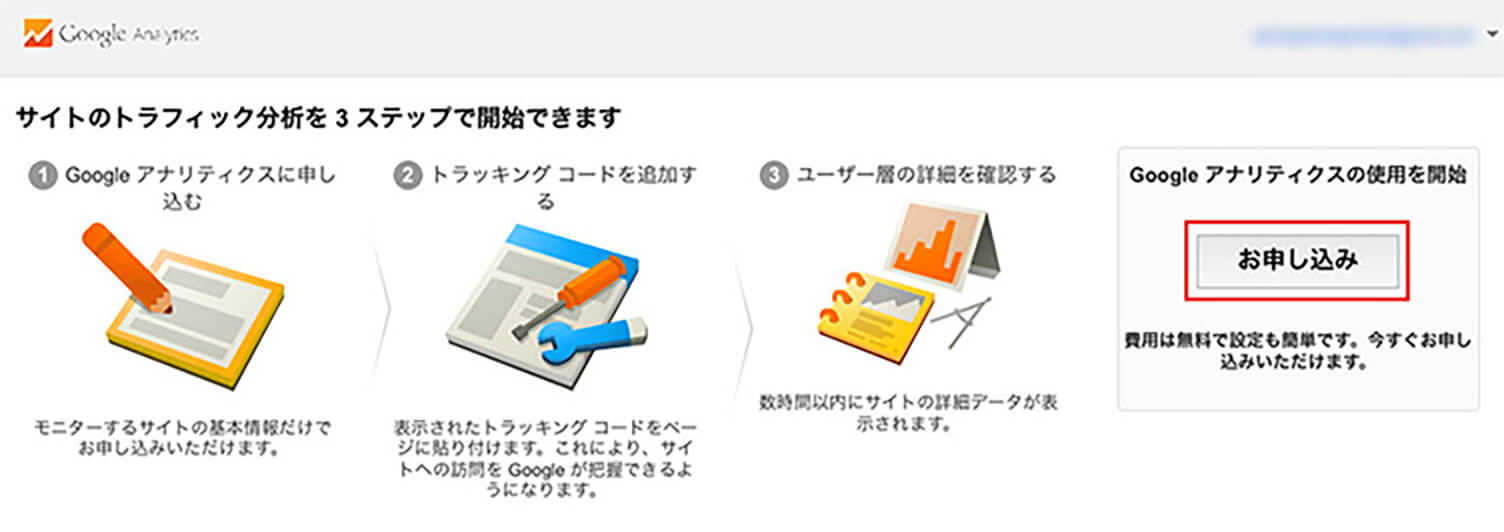
Click “Sign Up.”
You can now use Google Analytics with the Google account currently logged in.
Next, create your Google Analytics account.
Since multiple Google Analytics accounts can be linked to a single Google account, people who manage many websites may find it easier to manage them under the same Google account.
Next, several setup fields will appear. Fill them in as follows.
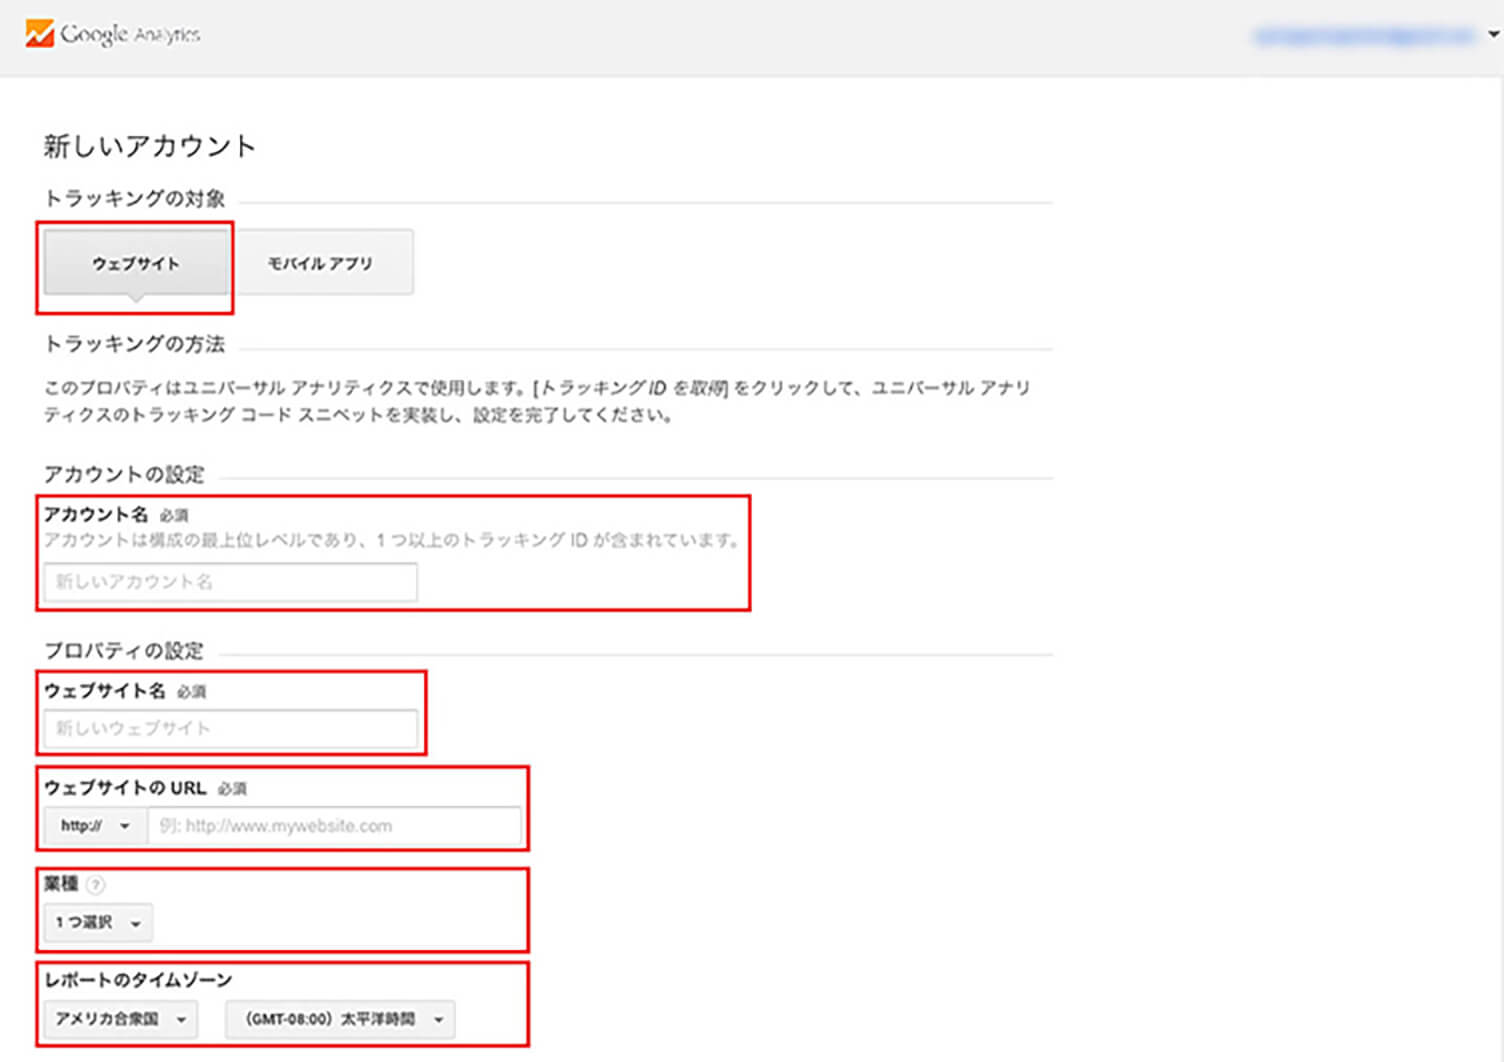
1. What would you like to track? (In this example, we’ll use a website.)
Select the target you want to analyze.
2. Account Name
Set the account name you will use for Google Analytics.
3. Website Name
Enter the name of the website where Google Analytics will be installed.
It is easier to manage if the actual website name and the “Website Name” field use the same name.
4. Website URL
Enter the URL of the website you want to analyze.
5. Industry Category
Choose the category that best matches your website’s content.
There are 26 categories available to choose from.
6. Reporting Time Zone
Set this to “Japan.”
After completing all fields, click “Get Tracking ID.”
The Terms of Service screen will appear. Set the country to “Japan” and click “I Agree.”
This completes your registration for Google Analytics.
Tracking Code and Installing Google Analytics
Next, let’s install :contentReference[oaicite:0]{index=0}.
To set it up, you need to add a “tracking code” to your website’s HTML files.
What Is a “Tracking Code”?
When someone accesses your website, the :contentReference[oaicite:0]{index=0} program runs and sends access data to :contentReference[oaicite:1]{index=1}’s servers, where the data is accumulated.
Google Analytics is the tool that collects and analyzes this data.
This program is what is called the “tracking code.”
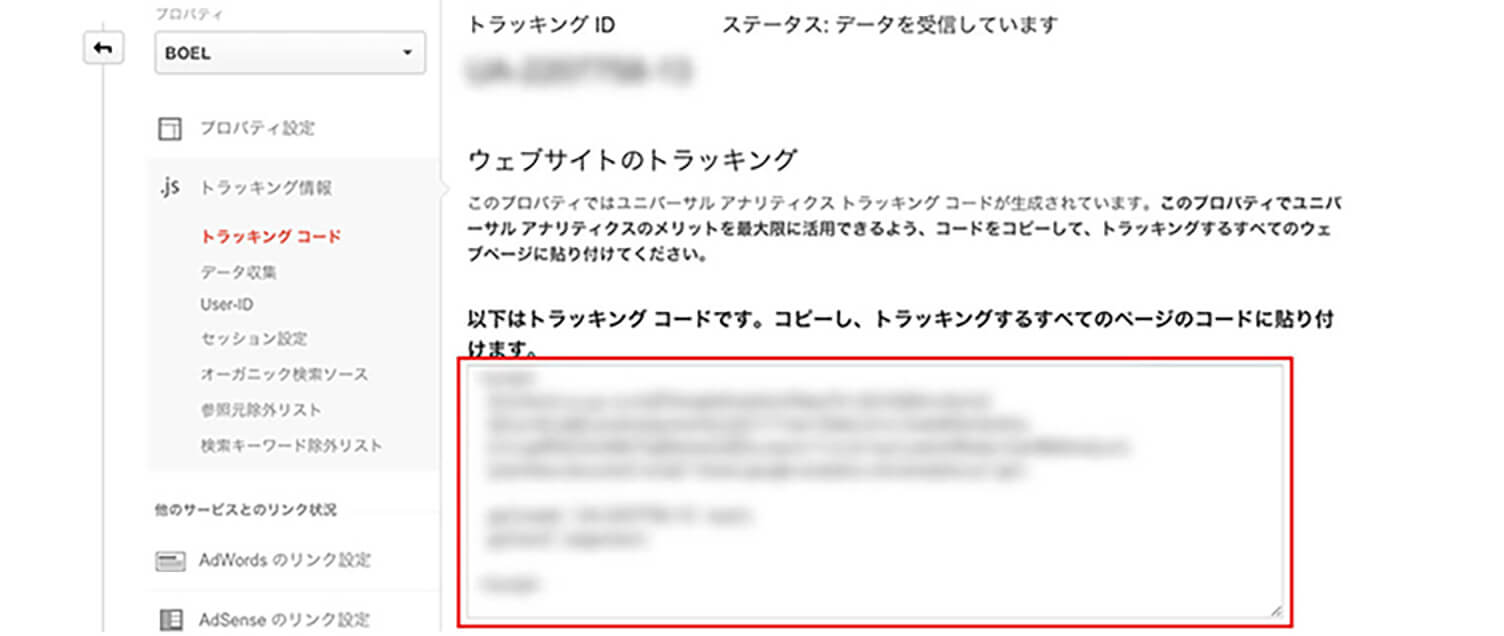
Install this code on the website where you want to use Google Analytics.
Once the code is added to your website, access analysis becomes possible.
If you have already registered with Google Analytics, you can find the tracking code by logging in to Google Analytics → clicking “Analytics Settings” at the top of the screen → “Property” in the Analytics Settings screen → “Tracking Info” → “Tracking Code.”
The tracking code should be placed inside the <head> ~ </head> tags of your website’s source code.
It should be installed on every page you want to analyze.
After uploading the updated source files, the tracking code setup is complete.
*Please note that there may be a slight delay before the tracking code becomes active in Google Analytics.
If data still does not appear in your reports after more than 24 hours, check whether the tracking code has been installed correctly.
Viewing Website Data with Google Analytics
Access the official :contentReference[oaicite:0]{index=0} website.

Log in using your :contentReference[oaicite:1]{index=1} account and password.
Click “All Website Data” for the website you want to analyze.
The main Google Analytics dashboard will then be displayed.
By clicking “Reports” at the top of the screen, you can view data related to your website traffic and user activity.

The Five Sections of “Reports” in Google Analytics
These sections are located on the left side of the screen.
Clicking each item will display more detailed categories and reports.
• Real-Time
Shows data about users who are currently accessing the website.
• Audience
Provides “user information” such as pageviews (the number of times pages were viewed) and sessions (a series of actions from entering the website until leaving it).
• Acquisition
Shows “how users are accessing the site,” such as which websites visitors are coming from and how much traffic each source generates.
• Behavior
Provides information about “user behavior,” such as which pages receive the most traffic and how users move from one page to another.
• Conversions
Allows you to set goals for a view and measure the rate at which those goals are achieved.
Viewing Basic Information
With so many categories and reports available, you may find yourself wondering, “Where should I even start?”
As a result, some people stop checking :contentReference[oaicite:0]{index=0} altogether, even after setting it up.
So below are some common questions people have about their websites and how to check that information in Google Analytics.
1. “I want to check the number of visits and pageviews.”
From the left-side menu, open “Audience” → “Overview.”
Here, you can check the number of visits, pageviews, and other basic traffic information.
You can also change the date range displayed in the upper-right corner of the screen to specify a custom period.
Once you set the desired time period, the corresponding data will be displayed.

2. “I want to know the gender and age of users visiting the site.”
From the left-side menu, go to “Audience” → “Demographics” → “Overview.”
Here, you can check the age and gender of your users.
This information can be useful for analyzing your target audience.

3. “I want to know where my traffic is coming from.”
From the left-side menu, open “Acquisition” → “Overview.”
This section categorizes how users arrived at your website and allows you to check metrics such as session percentage, bounce rate, and average session duration.

What Are “Top Channels”?
“Organic”: Traffic coming from search engines.
“Referral”: Traffic from users who arrived by following links from other websites.
“Social”: Traffic coming from social media platforms, such as:
・:contentReference[oaicite:0]{index=0}
・:contentReference[oaicite:1]{index=1}
・:contentReference[oaicite:2]{index=2}
・:contentReference[oaicite:3]{index=3}
・:contentReference[oaicite:4]{index=4}
and others.
“Direct”: Direct access includes traffic such as:
・Access by directly entering the URL
・Access from bookmarks
・Access from RSS readers, etc.
4. “I want to know what keywords users are searching for.”
From the left-side menu, go to “Acquisition” → “Campaigns” → “Organic Keywords.”
Here, you can see a list of the keywords used in searches.
*“(not provided)” means that the keyword could not be identified.

5. “I want to know which pages users leave the website from.”
From the left-side menu, go to “Behavior” → “Site Content” → “Exit Pages.”
Here, you can check a list of exit pages, along with the number of exits and exit rates for each page.

What Is an “Exit Page”?
An “Exit Page” is the page a user was viewing when they left your website.
For example, a user visits Page A on your website and then moves to Page B within the same site.
After that, the user leaves your website by moving to a completely different website or closing the browser.
In this case, Page B is considered the “Exit Page.”
Conclusion
What did you think?
Once you start learning about it, doesn’t it make you want to analyze your website even more?
In this article, we introduced :contentReference[oaicite:0]{index=0} as a beginner-friendly tool, but if you explore it more deeply, you can perform much more detailed data analysis, including integration with advertising services such as :contentReference[oaicite:1]{index=1}.
By gradually learning how to use it, you can identify trends such as what kinds of users are interested in your website and when your traffic peaks, allowing you to build effective strategies and improvements.
We hope you’ll make good use of it in your day-to-day website management.
RECENT POSTS

Vol.203
What Is Design Management

Vol.202
Why Hiring No Longer Works— Redesigning Organizations and Decisions for an Uncertain Age

Vol.201
How to Choose a Branding Agency: 5 Criteria to Avoid Failure

Vol.200
Design Management: A Practical Guide for SMEs and Startups to Drive Real Results

Vol.199
How to Rebuild Brand Competitiveness: A Practical Guide to Brand Management for SMEs

Vol.198
From parent–child bonds to community: The future of education that nurtures diversity and designs relationships


